Photography 101 – Aperture
Starting at the beginning.
I found it really hard to know where to start with this photography blog. There are plenty of books out there that will teach you all of this, but I think as long as a few fundamental concepts are explained and understood then most people will work out the rest for themselves. I want it to be simple, easy to understand and relatively jargon free. That said, its important to understand a little bit about how your camera works before we head into the nuts and bolts.
The lens focuses light onto the sensor which sits at the heart of your camera. The sensor has all those millions of pixels (Megapixels) that you paid good money for and is what has replaced what us older folk call ‘film’. This sensor has fairly restricted operating parameters, not enough light and an image will be too dark, too much light and everything is over exposed. Your camera and lens are working together to make sure that the amount of light that gets through to the sensor is just right and gives you the correct exposure. Your camera uses different tools to control the light hitting the sensor. These tools effect the final image in different ways and can be used creatively once you understand what they are doing. These tools are:
ISO | Aperture | Shutter Speed
These three things are interconnected, so changing one setting will require one of the others to be changed to compensate. Its a balancing act and knowing what you want your end result to be will give you a starting point. Often though the conditions you are shooting in will dictate what you can and cannot do.
APERTURE: Like your eyeballs.
This first post is all about aperture. I started with aperture because I find a lot of people ask me how to take those nice soft pictures with the background all out of focus. Mastering your aperture is how you get there…….
Aperture is one of the creative controls on your camera, its the bit that enables you to make the background all soft, fuzzy and bubbly while keeping your subject sharp, or it can also ensure you have sharpness from front to back in your image.
Physically, the aperture is the diaphragm within the lens of the camera that can be made larger or smaller to let in more or less light, just like the iris in your eye, closing down when its bright or opening up wide to let in as much light as possible when its dark.
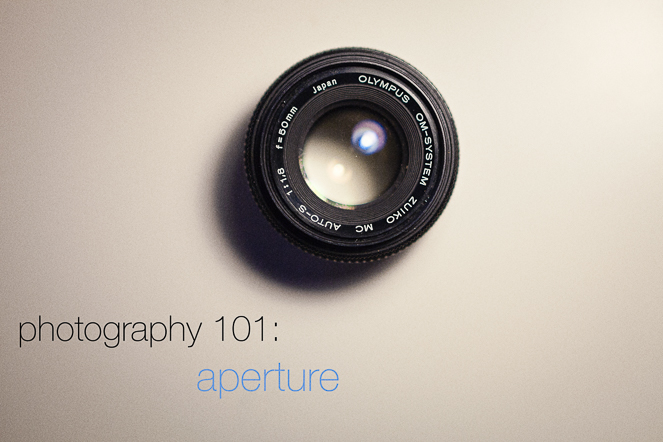
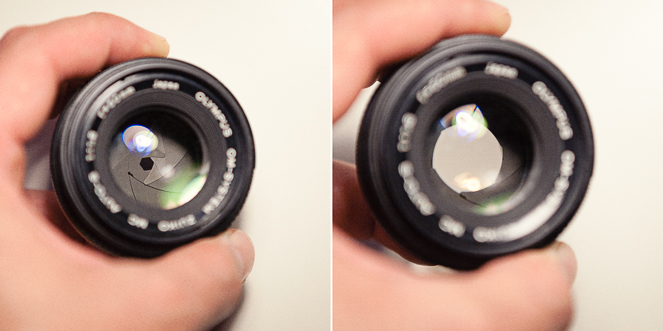
This is one of my old Olympus lenses, you can see on the left the small hole created by the aperture blades. On the right the aperture is much wider. The image at the top of this page is of the same lens with the aperture all the way open at f1.8.
Confusingly the numbering system is counter intuitive, so the smaller the number the bigger the aperture e.g f2.8 is a wide aperture that will let in lots of light, where as f22 is a very small aperture. There are two things to consider here; firstly a wide open aperture (small number) will let in lots of light meaning you can shoot in darker conditions. The other effect of shooting ‘wide open’ is a shallow depth of field i.e. only a small part of the image is in focus with foreground and background rendered blurry.
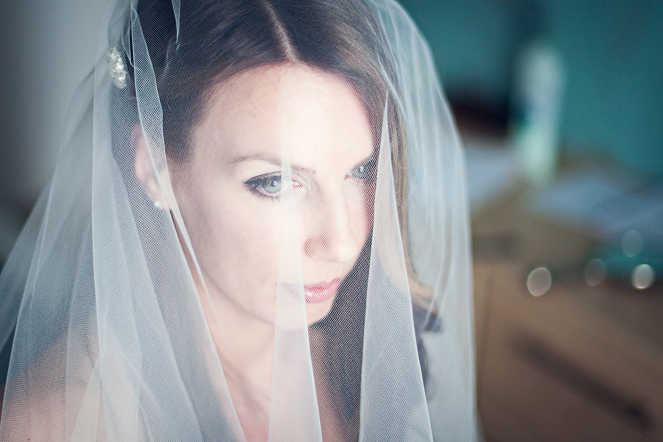
Shot at a huge aperture of f1.4, only the nearest eye is in focus.
Conversely a very small aperture (say f16) only lets minimal light pass through to the camera sensor so is useful in very bright conditions. Small apertures will have more depth of field so a scene can be rendered sharp from foreground to infinity.
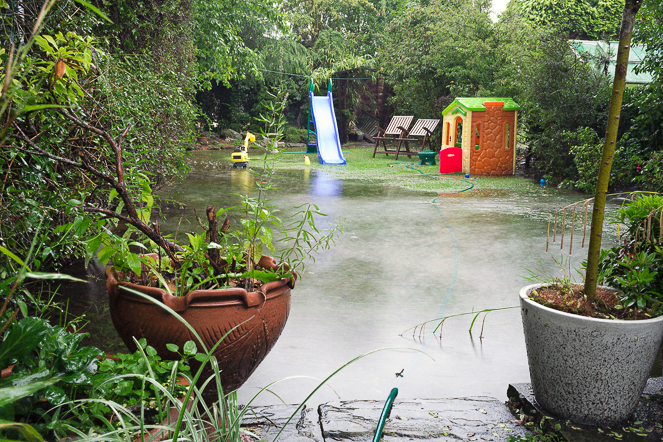
 Shot of my flooded back garden. At f22 everything is sharp from the plants in the foreground to the slide and chairs at the other end of the garden. I’m aware that the planter in the foreground is mostly full of weeds!
A shallow depth of field is lovely when you are shooting people because it will focus attention on the face, or even just the eyes. A deep depth of field is great when shooting landscapes and you want everything in focus from the rock just in front of you to the mountains on the horizon. I find that shallow depth of field is often something that people are trying to achieve but unfortunately it is an effect that is somewhat reliant on your camera and lens. An SLR with the right lens is great. There are creative compact cameras out there that will let you control aperture, its just that you won’t get apertures wide enough for a really shallow depth of field, but you should be able to get some of the way there. There are even iPhone apps that allow you to control aperture.
On your camera you are looking for the ‘Aperture Priority’ mode. In this mode you set the aperture you want and your camera compensates by changing the shutter speed and ISO. So dial in f2.8 or f4 so your background drops out of focus and your camera will compensate with the shutter speed and ISO.
On the top dial, set Canon cameras to ‘Av’ and Nikon to just ‘A’ for aperture priority mode. Other models may have different abbreviations and if its not obvious then i’m afraid you will have to dig out the manual and look it up (or just Google it!).
Go as wide as you can and experiment. Then go the other way and notice the changes to you images. Experiment with zoom and also distance from your subject as these have a bearing on the depth of field. Also keep an eye on the other settings and notice how the camera changes shutter speed and ISO to compensate for the aperture you dial in. These will be covered in further blogs but its good to start to notice how your camera is behaving. If you have photo editing software its likely that it will show you the settings used in each shot. For images you like take note of the settings and start to understand why the image looks like it does.
So the next time you wake up in the morning and the brightness hurts your eyes, consider that while you have been asleep your iris has jammed at around f1.8 and until it closes down a bit your eye is over exposing all you see, which hurts your brain and requires coffee to cure……
FURTHER NOTES
This bit is for those of you who want a deeper understanding. There are some more advanced concepts to be considered and if you feel ready then read on, but if you are a newb then feel free to ignore this and maybe come back at a later stage. You will probably find that you have worked out much of it yourself!
DOF
Depth Of Field is also referred to as ‘DOF’. For the remainder of this article i’ll be using this abbreviation to save my fingers!
Focal Length
The focal length, or zoom length, has an influence on the DOF within the final image. At long zooms you will get a more shallow DOF, further dropping the background out of focus. A wide angle lens will create a much wider DOF and you will struggle to drop the background out of focus. When shooting someone try zooming in with your camera and stand further away. This will give you a more shallow DOF. Be aware thought that a long zoom will compress the scene, making the background appear closer.
Distance to Subject
This also has an influence on the depth of field. If you are shooting at a fixed zoom of 50mm, say, and you get right in close to your subject you will get a more shallow DOF. Move further away and the DOF increases.
Loss of Sharpness
A lesser consideration with aperture is the fact that when shooting very wide open (f2.8 / f2 / f1.8 and beyond) the image becomes ‘soft’ as the light scatters around inside your camera and you lose some sharpness to the areas that are in focus. At the other end of the scale very small apertures f16 and beyond cause diffraction and again you begin to lose clarity. Lenses differ greatly but the sharpest point is usually between f8 and f11.
Focus Difficulty
At very wide apertures, usually beyond f2.8, your camera may take longer to focus, and may struggle to focus at all past f1.8. This is a limitation of the focusing system in most modern cameras and you will just need to take your time.
Careful Focus
When shooting really wide you have to be very careful about your focus. for the image of the bride above, I concentrated on getting focus right on the eye itself. If not careful you might accidentally focus on the end of the eye lashes, and the DOF is so shallow that the actual eye loses sharpens.
Multiple Subjects
Be aware that when there are a group of people in a shot your camera is only able to focus on one point. With a wide aperture this can mean that you have one person in focus and all the others in the shot are not as sharp. For group shots you need a wider DOF (smaller aperture) to ensure that everyone is sharp. As a rule of thumb, if the group are roughly in a line choose an aperture number that corresponds to the number of people. So for a couple, f2.8. For 4 people f4 and so on.
Vignette
Shooting wide open will cause a vignette effect on the final image. That means that the corners get darker and lose some sharpness. This effect can actually be quite desirable but is easily compensated for in many editing software programs.
Bokeh
Bokeh is a word used to describe the quality of the out of focus areas within an image. Often points of light in the background will appear as translucent illipses. Again, look at the photo of the bride above. To the right of the image are a few white ellipses, this is a good example of ‘bokeh’. Bokeh is dependent on the quality of the lens. Better lenses will create more attractive bokeh. Its also effected by the number of blades within the aperture of your lens, so goo lenses will boast 9 blades.
Lens
On the subject of lenses, if you want to shoot really soft images you need a fast lens i.e. a lens with a really large aperture. The best way to go is prime lenses. A prime lens has a fixed focal length (no zoom). Canon and Nikon both do relatively cheap primes, canon have a 50mm f1.8 at around £80 which is great value – Nikon do a 35mm f1.8 and 50mm f1.8 both at £150. You can go faster than f1.8 but price rockets. The Canon 50mm f1.4 is about £350 while the f1.2 is close to £1000! There is even a discontinued f1.0 that goes for upwards of £4000 on eBay – just so you know what to get me for Christmas!


